Private Operator for AWS integration guide
The EUID Operator is the API server in the EUID ecosystem. For details, see The EUID Operator.
For a Private Operator service running in AWS Marketplace, the EUID Operator solution is enhanced with AWS Nitro Enclave technology. This is an additional security measure to help protect EUID information from unauthorized access.
European Unified ID Private Operator for AWS is a free product. The cost displayed on the product page is an estimated cost for the necessary infrastructure.
By subscribing to the European Unified ID Operator on AWS Marketplace product, you gain access to the following:
- Amazon Machine Image (AMI) with the EUID Operator service installed and ready to bootstrap:
The AMI contains an Amazon Linux 2023 operating system with the EUID Operator service already set up. When an EC2 instance based on the AMI boots up, it automatically fetches the configuration from your AWS account and starts the EUID Operator server inside an enclave. - CloudFormation template:
The template deploys the EUID Operator AMI.
Operator version
The latest ZIP file is linked in the Release Notes column in the following table.
| Version name | Version #/release notes | AWS version | Date |
|---|---|---|---|
| H1 2026 | v5.70.159 | 5.70.159 | June 23, 2026 |
For information about supported versions and deprecation dates, see Private Operator versions.
Private Operator upgrade policy
To maintain security and operational integrity, outdated operator versions will be disabled after 12 months, which may cause affected deployments to shut down or fail to start. Upgrading ensures the use of the latest security and feature enhancements. We recommend upgrading proactively to avoid disruptions.
For critical security or operational issues, or where contract terms apply, we reserve the right to enforce tighter upgrade timelines for Private Operators.
Prerequisites
To subscribe and deploy one or more EUID Operators on AWS, complete the following steps:
- Register your organization as an EUID Operator.
- Create an AWS account with an IAM role that has the minimal privileges.
Minimal IAM role privileges
To succeed in a one-click deployment, your AWS account must have the privileges to run the following actions:
{
    "Version": "2012-10-17",
    "Statement": [
        {
            "Sid": "VisualEditor0",
            "Effect": "Allow",
            "Action": [
                "ec2:*",
                "kms:*",
                "autoscaling:*",
                "cloudformation:*",
                "iam:ListRoleTags",
                "secretsmanager:*",
                "iam:PutRolePolicy",
                "iam:AddRoleToInstanceProfile",
                "iam:ListRolePolicies",
                "iam:ListPolicies",
                "iam:GetRole",
                "iam:GetPolicy",
                "iam:DeleteRole",
                "iam:UpdateRoleDescription",
                "iam:TagPolicy",
                "iam:GetRolePolicy",
                "iam:CreateInstanceProfile",
                "iam:UntagRole",
                "iam:TagRole",
                "iam:ListInstanceProfilesForRole",
                "iam:PassRole",
                "iam:DeleteRolePolicy",
                "iam:ListPolicyTags",
                "iam:DeleteInstanceProfile",
                "iam:ListRoles",
                "iam:CreatePolicy",
                "iam:UntagPolicy",
                "iam:UpdateRole",
                "iam:UntagInstanceProfile",
                "iam:TagInstanceProfile",
                "iam:SetDefaultPolicyVersion",
                "iam:UpdateAssumeRolePolicy",
                "iam:GetPolicyVersion",
                "iam:RemoveRoleFromInstanceProfile",
                "iam:CreateRole",
                "iam:AttachRolePolicy",
                "iam:DetachRolePolicy",
                "iam:ListAttachedRolePolicies",
                "iam:DeletePolicy",
                "iam:ListInstanceProfileTags",
                "iam:CreatePolicyVersion",
                "iam:GetInstanceProfile",
                "iam:ListInstanceProfiles",
                "iam:ListPolicyVersions",
                "iam:DeletePolicyVersion",
                "iam:ListUserTags"
            ],
            "Resource": "*"
        }
    ]
}
Resources created
The following table lists all resources that are created during the deployment.
| Name | Type | Description |
|---|---|---|
KMSKey | AWS::KMS::Key | Custom KMS key used for encrypting the secrets in AWS Secrets Manager. |
SSMKeyAlias | AWS::KMS::Alias | An alias that provides an easy way to access the KMS key. |
TokenSecret | AWS::SecretsManager::Secret | A Secrets Manager secret to store the operator key. |
WorkerRole | AWS::IAM::Role | The IAM role that your EUID Operators run as. The role provides access to AWS Secrets Manager to retrieve operator keys. |
WorkerInstanceProfile | AWS::IAM::InstanceProfile | The instance profile with Worker Role to attach to Operator EC2 instances. |
SecurityGroup | AWS::EC2::SecurityGroup | A security group policy that provides rules for operator instances. See also Security group policy. |
LaunchTemplate | AWS::EC2::LaunchTemplate | A launch template with all configurations in place. You can spawn new EUID Operator instances from it. |
AutoScalingGroup | AWS::AutoScaling::AutoScalingGroup | An auto-scaling group (ASG) to which the launch template is attached. You can use this to update the desired number of instances later, if needed. |
Customization options
Here's what you can customize during or after the deployment:
- VPC: You must specify the existing VPC and related VPC Subnet IDs.
- Root volume size (8G Minimum)
- SSH key: This is the SSH key that you use to access the EUID Operator EC2 instances.
- Instance type: m5.2xlarge, m5.4xlarge, and so on. If there is no customization, the default value, m5.2xlarge, is recommended.
Security group policy
To avoid passing certificates associated with your domain into the enclave, inbound HTTP is allowed instead of HTTPS. This also avoids the cost of a secure layer, if used in a private network that is internal to your organization.
| Port number | Direction | Protocol | Description |
|---|---|---|---|
| 80 | Inbound | HTTP | Serves all EUID APIs, including the healthcheck endpoint /ops/healthcheck.When everything is up and running, the endpoint returns HTTP 200 with a response body of OK. For details, see Checking EUID Operator status. |
| 9080 | Inbound | HTTP | Serves Prometheus metrics (/metrics). |
| 443 | Outbound | HTTPS | Calls the EUID Core Service and AWS S3, to download files for opt-out data and key store. |
If your environment restricts outbound network traffic, you must allow outbound access to the destinations listed in Private Operator network egress.
VPC chart
The following diagram illustrates the virtual private cloud that hosts the Private Operator.

Preparing personal data for processing
It's critical that the input data, which you are converting to EUID, is in an acceptable format. If it isn't, you won't get the expected results. For example, you must normalize phone numbers to include the country code, as explained in Phone number normalization.
For details, see Preparing emails and phone numbers for processing.
To validate the full token generation pipeline end to end, confirming that tokens generated from your normalized, hashed, and encoded values are correct, use the EUID Token Validator.
Deployment
To deploy European Unified ID Operator on AWS Marketplace, complete the following steps:
- Subscribe to European Unified ID Operator on AWS Marketplace. It might take several minutes before AWS completes your subscription.
- Click Configuration and then specify configuration values.
- On the Configuration page, click Launch and then select the Launch CloudFormation action.
- In the Create Stack wizard, specify the template and then click Next. The S3 path for the template file is automatically filled in.
- Fill in the stack details and then click Next.
- Configure the stack options and then click Next.
- Review the information you have entered, and make changes if needed.
- If you are prompted for permission to create IAM roles, select the I acknowledge that AWS CloudFormation might create IAM resources checkbox.
- Click Create stack.
It takes several minutes for the stack to be created. When you see an Auto Scaling Group (ASG) created, you can select it and check the EC2 instances. By default, there is only one instance to start with.
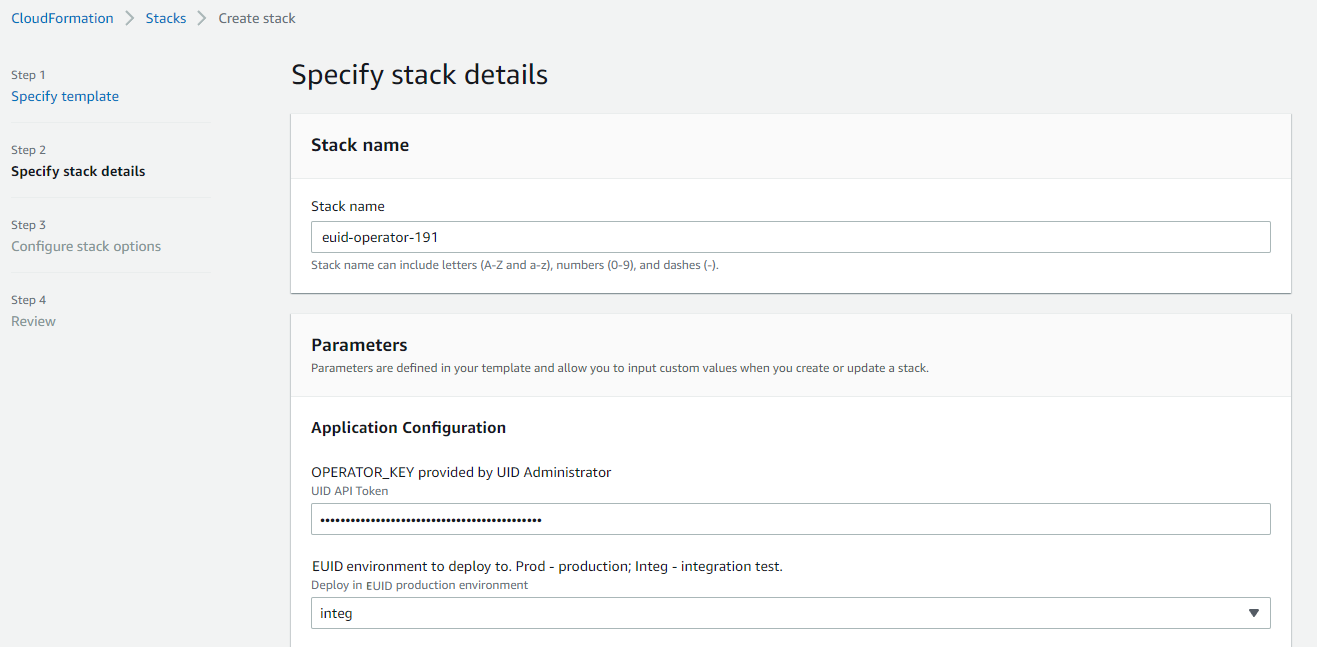
Stack details
The following images show the Specify stack details page in the Create stack wizard (deployment step 5). The table that follows provides a parameter value reference.
Lower part of the page:
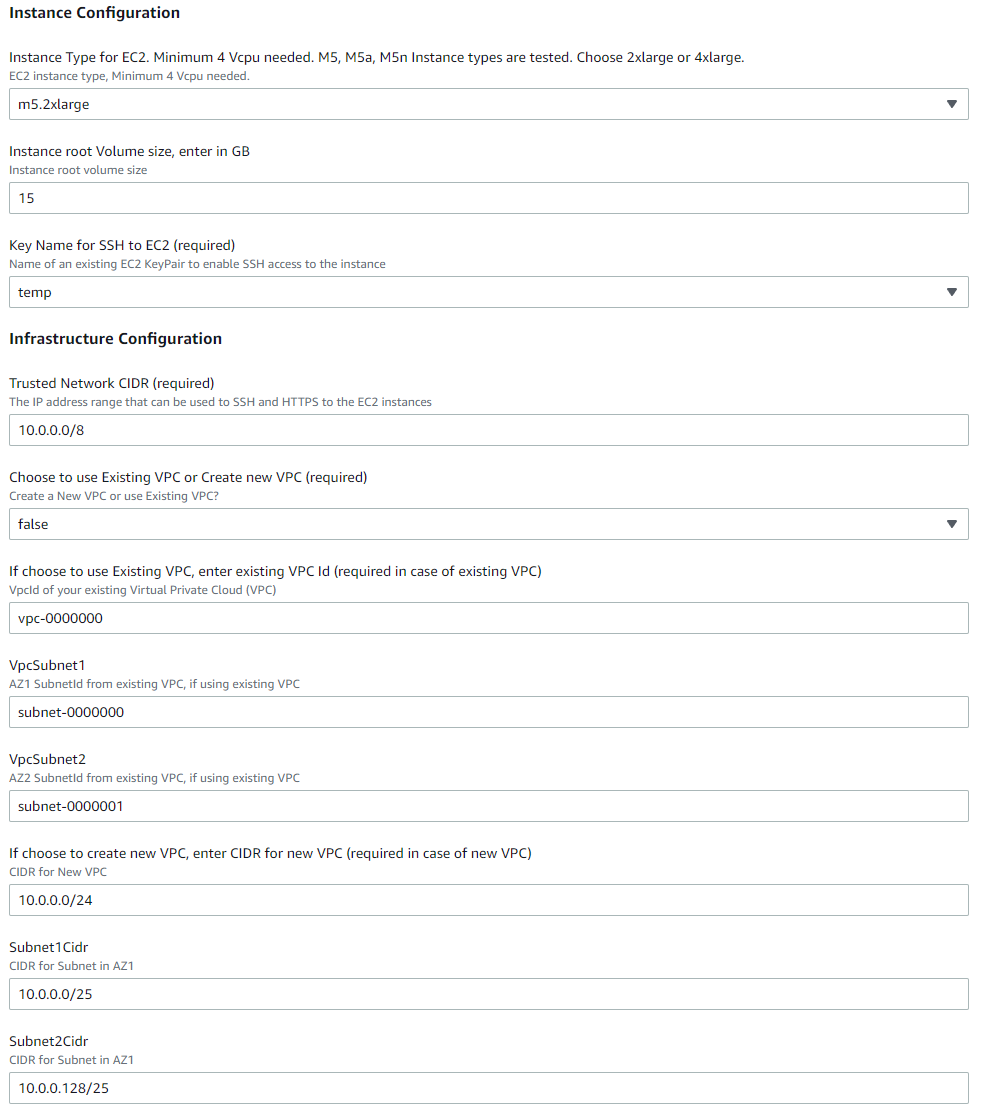
The following table explains the parameter values that you need to provide in step 5 during the deployment.
| Parameter | Description |
|---|---|
| Stack name | Any name of your choice. |
| OPERATOR_KEY | The Operator Key that you received from the EUID Admin team. |
| EUID Environment | Select prod for production environment or integ for the integration test environment. |
| Instance Type | m5.2xlarge is recommended. |
| Instance root volume size | 15 GB or more is recommended. |
| Key Name for SSH | Your EC2 key pair for SSH access to the deployed EC2 instances. |
| Trusted Network CIDR | The CIDR (Classless Inter-Domain Routing) value determines the IP address range that can access your operator service. To limit access to the EUID Operators so that they can only be accessed through an internal network or a load balancer, specify an internal IP range as the CIDR value. |
| VPC | The existing VPC ID. |
| VpcSubnet1 | The existing VPC AZ1 Subnet ID. |
| VpcSubnet2 | The existing VPC AZ2 Subnet ID. |
Stack configuration options
The following image shows the Configure stack options page in the Create stack wizard (deployment step 6).
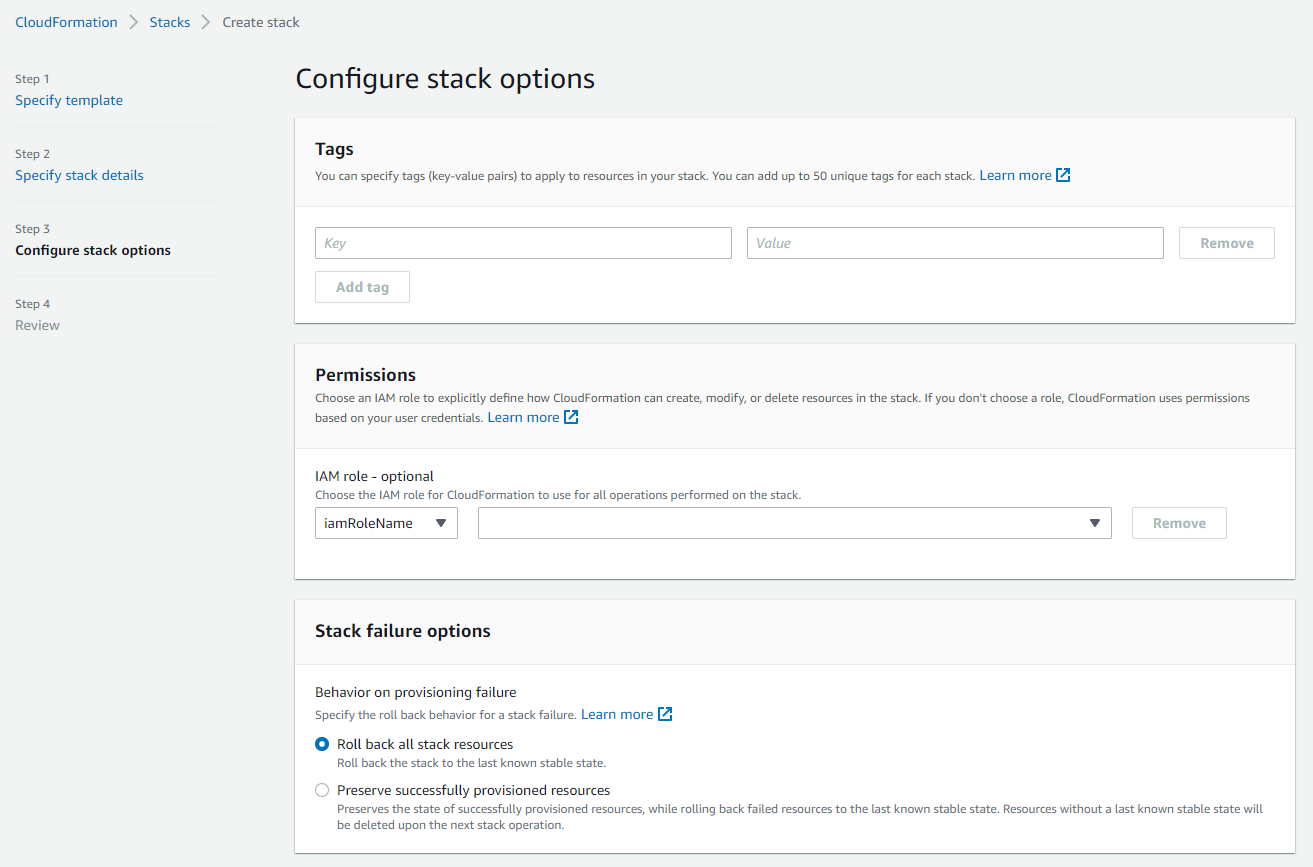
The following table explains the parameter values that you need to provide in step 6 during the deployment.
| Parameter | Description |
|---|---|
| Tags | (Optional) Tag your stack. |
| Permissions | If you have separate IAM roles subscribing to AWS marketplace and deploying the stack, enter the name/ARN of the role you will use to deploy the stack. |
| Stack failure options | Choose what happens when deployment fails. The Roll back all stack resources option is recommended. |
| Advanced options | These are optional. |
Creating a load balancer
To create a load balancer and a target operator auto-scaling group, complete the following steps:
- In the AWS Console, navigate to the EC2 dashboard and search for
Load Balancer. - Click Create Load Balancer.
- On the Load balancer types page, in the Application Load Balancer section, click Create.
- Enter the EUID Load balancer name. Depending on whether or not you need to access EUID APIs from public internet, choose the Internet-facing or Internal scheme.
- Select the VPC you used while creating the CloudFormation stack, and at least two subnets.
- Under Security groups, click Create new security group and do the following:
- Enter
EUIDSGALBas its Security group name, as well as a relevant Description. - Under Inbound rules, click Add rule, then select the HTTPS Type and an appropriate Source according to your requirements.
- Click Create security group.
- Enter
- Go back to the Load Balancer page and select the newly created
EUIDSGALBsecurity group. - Under Listeners and routing, click the Create target group link and do the following:
- On the Specify group details page, select Instances as the target type, then enter
EUIDALBTGas the Target group name. - Ensure HTTP1 is selected as the Protocol version.
- Under Health checks, provide
/ops/healthcheckas the Health check path, and then click Next. - Select EUID Operator EC2 Instances created by your auto-scaling group and then click Include as pending below.
- Make sure that all the ports for the targets contains
80. - Click Create target group.
- On the Specify group details page, select Instances as the target type, then enter
- Go back to the Load Balancer page, and under Listeners and routing, select
EUIDALBTGas the target group to forward to as a default action. Note that you may have to refresh the target groups for your newly created target group to appear. Change the listener Port value to443. - Set up an HTTPS listener by following the instructions in the AWS user guide.
- Click Create load balancer.
- To verify the status of this load balancer, please continue in the below section: Checking EUID Operator status.
Checking EUID Operator status
To check the EUID Operator status of your Load Balancer, complete the following steps:
- Identify the DNS name of your load balancer by going to EC2 > Load balancers and looking at the DNS name column of your load balancer.
- In your browser, go to
https://{dns-name-of-your-load-balancer}/ops/healthcheck. A response ofOKindicates good operator status.
Private Operator attestation failure
When a Private Operator fails to attest with the Core service, one of the following actions happens:
- HTTP 401 response. The Private Operator terminates itself immediately.
- Likely Causes: Operator key revoked or incorrect.
- Any other non-200 response code. The Private Operator continues to function for 12 hours. If the issue is not resolved in this time frame, it terminates itself.
- Likely Causes: Core service issues, network issues.
Private Operator hosts must have infrastructure in place to handle alerting and restarting operators in the case of an error.
Upgrading the EUID Operator
For each operator version update, each Private Operator receives an email notification with an upgrade window. After the upgrade window, the old version is deactivated and is no longer supported.
Here's what you need to know about upgrading:
- Information on the availability of new versions is provided on the European Unified ID Operator on AWS Marketplace page.
- To upgrade your EUID Operators, launch a new instance from the AWS Marketplace. For details, see Deployment.
For a smooth transition, create the new stack first. After the new stack is bootstrapped and ready to serve, delete the old stack. If you are using a load balancer, first get the new instances up and running and then convert the DNS name from the previous one to the new one.
Managing the logs
Use the following sections to help you make the best use of your logs:
- Where to read logs
- Default log settings
- Changing the log rotation schedule
- Additional commands for logging
Where to read logs
To access the logs, ssh into the EC2 instance. The logs are located at /var/logs/ and are in the format operator.log-<timestamp rotated>.
Default log settings
The EUID system uses syslog-ng for log generation and employs logrotate with cron jobs to manage log rotation and prevent excessive log size. The following sections provide information on the default settings and the reasons behind them, and give guidance for customizing the log rotation configuration to meet your specific requirements:
Log rotation configuration
When the operator instance has been deployed, the default log rotation settings are applied, as follows:
- Logs are rotated daily and 30 log entries are kept, so the log history is equivalent to 30 days of data if the log entries are not abnormally large.
- If log entries are very large, and the log size reaches 30 MB within a 24-hour period, the log is rotated at that point.
Log rotation default settings
The following are the default logrotate settings, defined in /etc/logrotate.d/operator-logrotate.conf:
/var/log/operator.log*
{
        rotate 30
        daily
        maxsize 30M
        dateext dateformat -%Y-%m-%d-%s
        notifempty
        sharedscripts
        postrotate
                /usr/sbin/syslog-ng-ctl reload
        endscript
}
For a detailed explanation of this config, see logrotate(8) - Linux man page, or run logrotate man in the Linux environment.
cronjob configuration
The logrotate generates the following script in /etc/cron.daily by default:
#!/bin/sh

/usr/sbin/logrotate -s /var/lib/logrotate/logrotate.status /etc/logrotate.conf
EXITVALUE=$?
if [ $EXITVALUE != 0 ]; then
    /usr/bin/logger -t logrotate "ALERT exited abnormally with [$EXITVALUE]"
fi
exit 0
The following script in /etc/cron.d ensures that the logrotate check is run every minute:
# Run the minutely jobs
SHELL=/bin/bash
PATH=/sbin:/bin:/usr/sbin:/usr/bin
MAILTO=root
* * * * * root /usr/sbin/logrotate -s /var/lib/logrotate/logrotate.status /etc/logrotate.conf
These are the default settings for the following reasons:
- The script ensure that the
maxsizecondition is checked frequently. - The command refers to
/var/lib/logrotate/logrotate.statusto check the log status and see if it has reached the rotation condition, so that it won't make extra rotations whenlogrotateis run every minute.
Changing the log rotation schedule
To change the log rotation schedule, update the etc/logrotate.d/operator-logrotate.conf file.
Follow the instructions in the logrotate documentation: see logrotate(8) - Linux man page.
The service does NOT need to be restarted to pick up the change.
Additional commands for logging
The following table includes some additional commands that might help you manage logs.
| Action | Command |
|---|---|
| Provides a detailed explanation of what will be rotated. | sudo logrotate -f /etc/logrotate.conf --debug |
Runs one iteration of logrotate manually, without changing the scheduled interval. | sudo logrotate -f /etc/logrotate.conf --force |
Reloads syslog-ng. | sudo /usr/sbin/syslog-ng-ctl reload |
Keeping the operator key secure
Here are some guidelines for keeping your operator key secure:
- When you receive your operator key, store it in a secure location.
- Keep track of all places where the key is used, so that if you need to rotate it you can do so quickly.
- Establish a process for replacing the existing value with a new one if the key is compromised.
- Rotate it on a regular cadence—for example, yearly—to help reduce the risk of the key being compromised.
EUID Operator error codes
The following sections list error codes that might occur during a Private Operator's startup or runtime.
Error codes for Private Operator issues are applicable only to release v5.49.7 and later.
Startup errors
The following errors might occur during operator startup:
| Error code | Issue | Steps to resolve |
|---|---|---|
| E01 | InstanceProfileMissingError | Attach an IAM instance profile to the EC2 instance with the required permissions. The EUID Operator needs these permissions to access configurations from AWS Secrets Manager. |
| E02 | OperatorKeyNotFoundError | Make sure that the secret referenced by the Private Operator exists in AWS Secrets Manager in the same region as the operator, and that the IAM instance profile has permission to access the secret. If needed, you can check the logs for the specific secret name and region. |
| E03 | ConfigurationMissingError | Required attributes are missing in the configuration. Refer to the logs for details and update the missing attributes in Secrets Manager. |
| E04 | ConfigurationValueError | A configuration value is invalid. Verify that the configuration values in the AWS Secrets Manager align with the required format and environment. Note debug = true is allowed only in the integ environment. Check the logs for more details. |
| E05 | OperatorKeyValidationError | Ensure the operator key is correct for the environment and matches the one provided to you. |
| E06 | UID2ServicesUnreachableError | Allow EUID core and opt-out service IP addresses in the egress firewall. For IP addresses and DNS details, refer to the logs. |
Runtime errors
The following errors might occur during operator runtime:
| Error code | Issue | How to identify in logs | Steps to resolve |
|---|---|---|---|
| E12 | Data Download Failure | Look for log messages containing E12: Data Download Failure or Failed to load errors from RotatingStoreVerticle. These messages include HTTP status codes (for example, HTTP response code 403) or exception types (for example, exception: IOException). | Check the HTTP status code or exception in the error message and resolve accordingly: 404 errors: Verify that the operator key is valid for the environment. 403 errors: Verify that the operator key and credentials are correct. Timeout errors: Verify network connectivity, check that firewall/security group settings allow outbound HTTPS (port 443), and ensure that the EUID service endpoints are accessible. 500/503 errors: This code indicates a temporary EUID service issue. Retry, and if the error persists contact EUID support. |
Technical support
If you have trouble subscribing to the product, or deploying, contact us.